How to setup Port Forwarding
Disclaimer – Call Flow do not support and will not support port forwarding of your router. It is however possible to port forward and the guide below is provided to help our customer achieve this.
1. To start, you need to go to your internet browsers, i.e. Internet Explorer, Google Chrome, and Mozilla Firefox and type 192.168.1.1 into the address bar and press enter.
![]()
2. The home screen will now appear. You will need to go to the top right hand corner and click sign in.

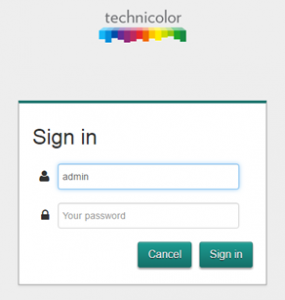
3. The user log in screen will pop up, you need to enter your username and password which are outlined below;
- Username: admin
- Password: (Your password is your routers serial number, this can be found on the bottom of the router)
- Once you have entered your password, click sign in.
- If this password does not work, you will need to reset the configuration on the router by holding a pin/paperclip in the reset hole on the back of the router until the power light starts flashing. At this point, you can take the pin out and the router will take 5-10 minutes to sync back up with the Call Flow equipment and you will then be able to access the router. You will then need to enter the username and password as detailed above.
After you have signed in you will be prompted to change your password, however you may skip this if you wish to keep the default password. Please note: If you change the password and later on request support from Call Flow we will require the password in order for us to log on to help you.
4. Once logged in you will need to go to the WAN services box (located on the second row in the third column) and click the small setting button (which appears when you hold your mouse over the wireless box).
5. You will then see the WAN services page and see ‘Add new IPv4 port mapping’, by clicking the Drop down arrow will give you a list of pre-sets you are also able to add a customer port forward by clicking on the main button and filling in the relevant details for your port.
![]()